Managing a VMware Template Lifecycle with Ansible
When we manage a large number of virtual machines (VMs), we want to
reduce the differences between them and create a standard template. By
using a standard template, it becomes easier to manage and propagate the
same operation on the different nodes. When using VMware vSphere, it is
a common practice to share a standardized VM template and use it to
create new VMs. This template is often called a golden image. Its
creation involves a series of steps that can be automated with Ansible.
In this blog, we will see how one can create and use a new golden image.
Prepare the golden image
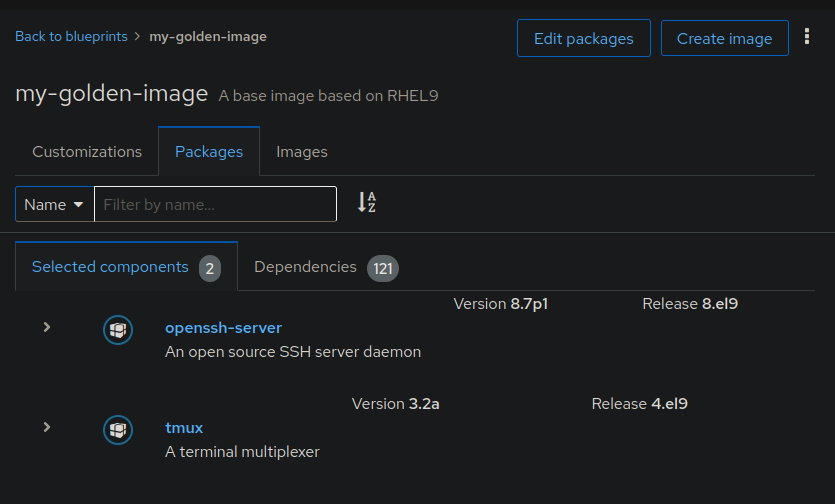
We use image builder
to prepare a new image. The tool provides a user interface that allows
users to define custom images. In this example, we include the SSH
server and tmux. The result image is a file in the VMDK4 format that is
not totally supported by VMware vSphere 7, so this is the reason why we
use a .vmdk-4 suffix.
We upload the image using the uri module. Uploading large files using
this method is rather slow. If you can, you may want to drop the file
on the datastore directly (e.g: NFS/CIFS). The following example
considers that the datastore is called rw_datastore and the datacenter
name is my_dc. The following excerpt from the playbook shows how we
upload the image.
- name: Upload from contents of remote file
  ansible.builtin.uri:
    force_basic_auth: true
    url: 'https://vcenter.test/folder/my-vmdk/my-golden-image.vmdk-4?dcPath=my_dc&dsName=rw_datastore'
    url_username: '{{ lookup("ansible.builtin.env", "VMWARE_USER") }}'
    url_password: '{{ lookup("ansible.builtin.env", "VMWARE_PASSWORD") }}'
    method: PUT
    status_code: 201
    src: my-golden-image.vmdk-4
    validate_certs: false
    follow_redirects: yes
Now that we've uploaded our file, we will convert it as an up to date
VMDK file. For this purpose, we use
vmkfstools.
The tool is available on the ESXi7 hosts by default. In the task below,
we use delegate_to: esxi1.test to run the command on one of our hosts.
- name: Convert the image in an up to date VMDK format
  ansible.builtin.command: "vmkfstools -i /vmfs/volumes/rw_datastore/my-vmdk/my-golden-image.vmdk-4.vmdk-4   /vmfs/volumes/rw_datastore/my-vmdk/my-golden-image.vmdk -d thin"
  delegate_to: esxi1.test
  vars:
      ansible_user: root
      ansible_python_interpreter: /bin/python3
Preparing the golden VM
At this stage, the disk is ready and we can connect it to a VM.
- name: Create a VM
  vmware.vmware_rest.vcenter_vm:
    placement:
      cluster: ""
      datastore: ""
      folder: ""
      resource_pool: ""
    name: my-golden-vm
    guest_OS: RHEL_7_64
    hardware_version: VMX_11
    memory:
      hot_add_enabled: true
      size_MiB: 1024
    disks:
      - type: SATA
        backing:
          type: VMDK_FILE
          vmdk_file: "[rw_datastore] my-vmdk/my-golden-image.vmdk"
    cdroms:
      - type: SATA
        sata:
          bus: 0
          unit: 2
    nics:
      - backing:
          type: STANDARD_PORTGROUP
          network: ""
  register: my_vm
There are four different ways to clone a VM with Ansible's
vmware.vmware_rest collection.
This article explains the difference between them and how to use them
with Ansible.
Cloning the VM
When we clone a VM, we create a copy of the original. However, the
original can still evolve and a second clone from the same VM is likely
to be different. There is no guarantee that two clones will be based on
exactly the same image.
The vmware.vmware_rest.vcenter_vm module allows us to prepare either
an instant clone or a regular clone.
Instant clone
According to the VMware official documentation,
an instant clone is a lightweight copy of a live VM. It shares memory
blocks with the original VM. This is the reason why the original VM must
be running before we can clone it.
- name: Turn the power on the VM on, since it's are pre-condition for Instant Clone
  vmware.vmware_rest.vcenter_vm_power:
    state: start
    vm: '{{ my_vm.id }}'

- name: Wait until my VM is ready
  vmware.vmware_rest.vcenter_vm_tools_info:
    vm: '{{ my_vm.id }}'
  register: vm_tools_info
  until:
  - vm_tools_info is not failed
  - vm_tools_info.value.run_state == "RUNNING"
  retries: 10
  delay: 5
Now we've got the VM up and running, we can instant clone it:
- name: Create an instant clone of a VM
  vmware.vmware_rest.vcenter_vm:
    placement:
      datastore: "{{ lookup('vmware.vmware_rest.datastore_moid', '/my_dc/datastore/local') }}"
      folder: "{{ lookup('vmware.vmware_rest.folder_moid', '/my_dc/vm') }}"
      resource_pool: "{{ lookup('vmware.vmware_rest.resource_pool_moid', '/my_dc/host/my_cluster/Resources') }}"
    state: instant_clone
    source: "{{ my_vm.id }}"
    name: instant_clone_1
Regular clone
We can also clone an existing VM.
The operation takes more time, up to several hours, if the VM comes with
large disks. The operation creates a full clone of the original VM. This
time, the original VM doesn't need to be running.
- name: Create a full clone of a VM
  vmware.vmware_rest.vcenter_vm:
    placement:
      datastore: "{{ lookup('vmware.vmware_rest.datastore_moid', '/my_dc/datastore/local') }}"
      folder: "{{ lookup('vmware.vmware_rest.folder_moid', '/my_dc/vm') }}"
      resource_pool: "{{ lookup('vmware.vmware_rest.resource_pool_moid', '/my_dc/host/my_cluster/Resources') }}"
    state: clone
    source: "{{ my_vm.id }}"
    name: full_clone_1
Build a template
Unlike clone, a template gives us the guarantee that the VM inherits
from a static VM image. The vmware.vmware_rest collection gives us the
ability to prepare OVF packages, and since the 2.2.0 release, we can
also prepare a template VM.
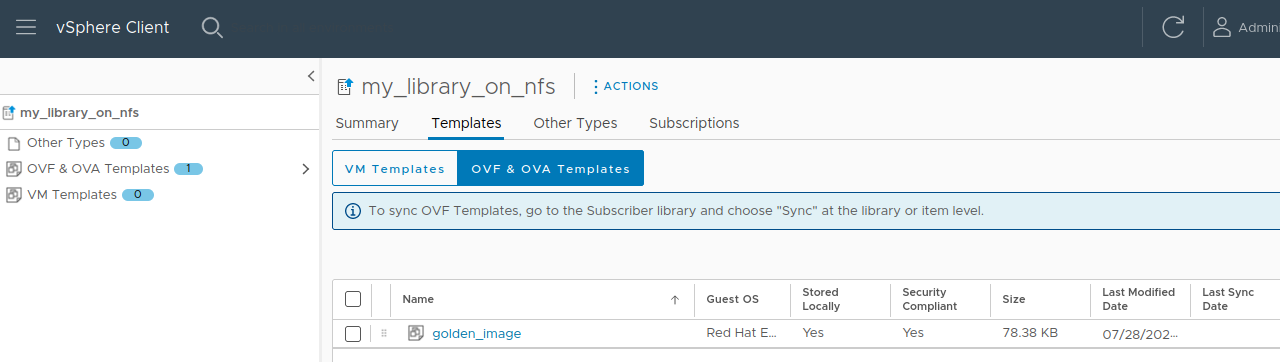
Export a VM as an OVF package on a content library
We can export a VM as an OVF package and upload the package into a
content library. This is handy if you want to prepare a standard
template that you will reuse on your vSphere infrastructure. Also, an
OVF package can be downloaded from one vSphere and be reuploaded in a
different one.
In this example, we use Ansible to prepare the OVF package. In this
example, my_vm is not running and the content library is called
my_library_on_nfs.
- name: List all Local Content Library
vmware.vmware_rest.content_locallibrary_info:
register: all_content_libraries
- name: Use the name to identify the right Content Library
set_fact:
nfs_lib: "{{ all_content_libraries.value | selectattr('name', 'equalto', 'my_library_on_nfs')|first }}"
- name: Export the VM as an OVF on the library
vmware.vmware_rest.vcenter_ovf_libraryitem:
session_timeout: 2900
source:
type: VirtualMachine
id: "{{ my_vm.id }}"
target:
library_id: "{{ nfs_lib.id }}"
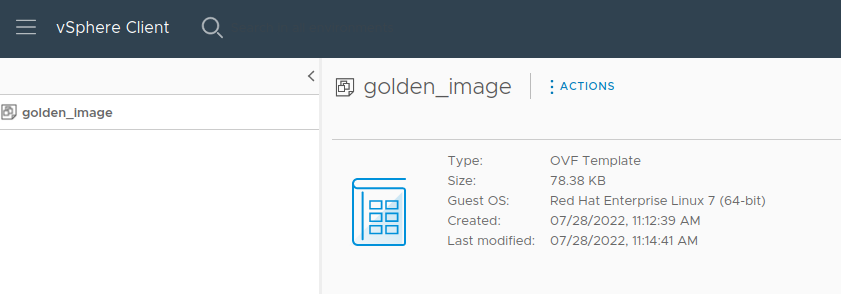
create_spec:
name: golden_image
description: an OVF example
flags: []
state: present
To spawn a new VM based on this OVF package, you need first to identify
its item entry on the content library.
- name: Get the list of items of the NFS library
  vmware.vmware_rest.content_library_item_info:
    library_id: '{{ nfs_lib.id }}'
    register: lib_items
- name: Define a new fact with the golden image ID
  ansible.builtin.set_fact:
    golden_image_id: '{{ (lib_items.value|selectattr("name", "equalto", "golden_image")|first).id }}'
Once we've got the item ID, we can call vcenter_ovf_libraryitem to
spawn a new VM. Since the ID is immutable, we can save for a future use.
- name: Create a new VM based on the OVF
  vmware.vmware_rest.vcenter_ovf_libraryitem:
    ovf_library_item_id: '{{ golden_image_id }}'
    state: deploy
    target: resource_pool_id: "{{ lookup('vmware.vmware_rest.resource_pool_moid', '/my_dc/host/my_cluster/Resources') }}"
    deployment_spec:
      name: my_vm_from_ovf
      accept_all_EULA: true
      storage_provisioning: thin
Export a VM as a VM template on a content library
The template creation is done with one call of the
vmware.vmware_rest.vcenter_vmtemplate_libraryitems module. This module
was introduced in the vmware_rest collection 2.2.0.
Here, nfs_lib is your content library and your VM details are
registered in the my_vm variable.
- name: Create a VM template on the library
  vmware.vmware_rest.vcenter_vmtemplate_libraryitems:
    name: golden-template
    library: "{{ nfs_lib.id }}"
    source_vm: "{{ my_vm.id }}"
    placement:
      cluster: "{{ lookup('vmware.vmware_rest.cluster_moid', '/my_dc/host/my_cluster') }}"
      folder: "{{ lookup('vmware.vmware_rest.folder_moid', '/my_dc/vm') }}"
      resource_pool: "{{ lookup('vmware.vmware_rest.resource_pool_moid', '/my_dc/host/my_cluster/Resources') }}"
To spawn a new VM based on this template, we once again need to identify
the item on the content library.
- name: Get the list of items of the NFS library
  vmware.vmware_rest.content_library_item_info:
    library_id: '{{ nfs_lib.id }}'
  register: lib_items

- name: Use the name to identify the item
  set_fact:
    my_template_item: "{{ lib_items.value | selectattr('name', 'equalto', 'golden-template')|first }}"
We use the same module for the deployment:
- name: Deploy a new VM based on the template
  vmware.vmware_rest.vcenter_vmtemplate_libraryitems:
    name: vm-from-template
    library: "{{ nfs_lib.id }}"
    template_library_item: "{{ my_template_item.id }}"
    placement:
      cluster: "{{ lookup('vmware.vmware_rest.cluster_moid', '/my_dc/host/my_cluster') }}"
      folder: "{{ lookup('vmware.vmware_rest.folder_moid', '/my_dc/vm') }}"
      resource_pool: "{{ lookup('vmware.vmware_rest.resource_pool_moid', '/my_dc/host/my_cluster/Resources') }}"
    state: deploy
In conclusion, in just a couple of Ansible tasks, we can promote an
existing VM as a Template. This allows us to rely on Ansible to automate
the maintenance of our VM Templates and ensure the reproducibility of
the process.