Ansible data manipulation with a Filter

This year at Summit, an attendee posed a question about how to work with setting facts and changing data in Ansible. Many times we’ve come across people using task after task to manipulate data, to turn items into lists, filter our options, trying to do heavy data manipulation and to turn data from one source into another. Trying to make these programmatic changes using a mixture of YAML and Jinja inside of roles and playbooks is a headache of its own. While many of these options will work, they aren’t very efficient or easy to implement. Ansible Playbooks were never meant for programming.

One solution that is usually overlooked is to do the manipulation in Python inside of a module or a filter. This article will detail how to create a filter to manipulate data. In addition, a repository for all code referenced in this article has been created.

This example was first developed as a module. However after review, it was determined that these data transformations are best done as filters. Filters can take multiple data inputs, do the programmatic operations, and then can be used in line where they are used as input or set as a fact. In addition, this runs locally and not at the host level, so it can be faster and avoid unnecessary connections.

Starting Point

To begin, we need a dataset to work on. For this we used data from the automation controller API, workflows; it gives nested data on the nodes in each workflow to loop around. The variable file used in this case can be found in the repo.

The goal is to find what is being used in the automation controller looping over nested lists. While this is not a very practical example, it does give a starting point for creating a filter to manipulate any dataset.

Filter Basics

The bones of this filter were taken from ansible.netcommon.pop_ace. The start of every filter has some required options, such as FilterModule, and in addition AnsibleFilterError is good for troubleshooting.

from ansible.errors import AnsibleFilterError

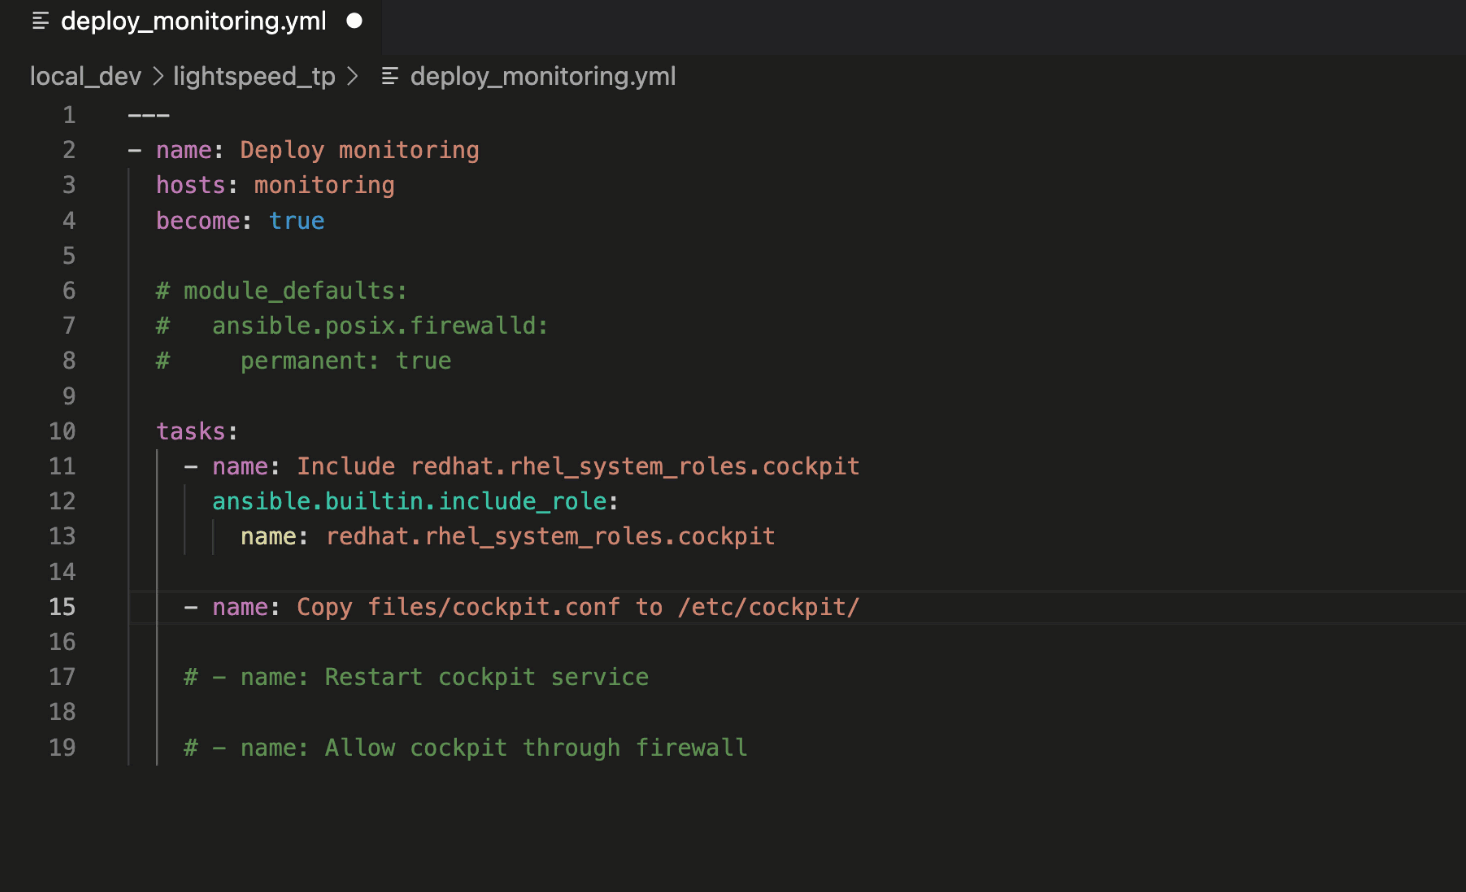
The class invocation sets the code as a filter, and invokes the function to use for the filter. This sets the filter called "used" in the playbook, and the function to invoke. Note that the function and the filter name do not need to match.

class FilterModule(object):
    def filters(self):
        return {"example_filter": self.workflow_manip}

Then there is the documentation section: This can contain inputs, examples and other metadata. This is also how the ansible-docs are populated.

EXAMPLES = r"""
    - name: Transform Data
        ansible.builtin.set_fact:
        data_out: "{{ workflow_job_templates | example_filter }}"
    """

For the most part this should be standard information. While the documentation field is not required for filters, it is best practice to include it. While not shown here, the linked example also includes commented out expected output, which is great for going back and troubleshooting in the future.

Setting things up

The first thing to do is set the filter arguments for data coming in. In our case the variable data_in, and that the input is of type dict. It is also best to set the return variable as empty here and any other defaults that need defined.

def example_filter(self, data_in: dict):
        workflow_data = {}
        workflow_data["workflows"] = []
        workflow_data["job_templates"] = []
        workflow_data["inventory_sources"] = []
        workflow_data["approval_nodes"] = []

The next step is to do the actual data manipulation.

In the thick of it

This is where we get to what we actually want to do, take data from a source, loop through it, and extract the data needed. As the data is contained in nested lists, there is an inner and outer loop to go through.

for workflow in data_in:
        workflow_data["workflows"].append(workflow["name"])
        for node in workflow["related"]["workflow_nodes"]:
            if node["unified_job_template"]["type"] == "inventory_source":
                workflow_data["inventory_sources"].append(
                        node["unified_job_template"]["name"]
                )
            elif node["unified_job_template"]["type"] == "job_template":
                workflow_data["job_templates"].append(
                    node["unified_job_template"]["name"]
                )
            elif node["unified_job_template"]["type"] == "workflow_approval":
                workflow_data["approval_nodes"].append(
                    node["unified_job_template"]["name"]
                )
            else:
                raise AnsibleFilterError(
                    "Failed to find valid node: {0}".format(workflow)
                )

The first loop is to find the workflow name field and append it to the workflow list. The next loop goes through each workflow node, finds what type it is, and appends it to the appropriate list.

At the end is the error message, which should not be hit with valid data, however it is a useful bit of code to insert elsewhere when building or troubleshooting modules to force output to console in order to figure out what is going on. At the end of our manipulations, return with the result variable. The alternative would be three tasks, of which two would use loops, to achieve the same results. By using an actual programming language, its available libraries, and internalized loops, it simplifies the playbook, and provides better logic then what could be cobbled together using YAML and Jinja2 alone.

Summary

Hopefully this article provides a starting point for creating filters and simplifying tasks in playbooks. Just like everything in Ansible, there is not a single solution, there are 10 options to choose from. Not every solution fits the situation at hand. Hopefully this provides another better option to work with.


Welcome to the Ansible Lightspeed with IBM Watson Code Assistant Technical Preview

Welcome to the Ansible Lightspeed with IBM Watson Code Assistant Technical Preview

At Red Hat Summit and AnsibleFest 2023, we announced Ansible Lightspeed with IBM Watson Code Assistant, a new generative AI service for Ansible automation. Today, we are thrilled to announce the Ansible Lightspeed technical preview launch.

In this blog, we'll walk through the steps to access the Ansible Lightspeed with IBM Watson Code Assistant technical preview service and get it up and running in your Visual Studio Code environment. Then we'll share more about what you can expect from the experience and how to generate your first Ansible tasks with generative AI.

This is exciting stuff, so let's dive right in.

Technical Preview: Empowering Ansible Users with AI

Ansible Lightspeed with IBM Watson Code Assistant is a purpose-built generative AI tool that aims to streamline the creation of Ansible content. This capability is natively integrated into your VS Code editor via the Ansible VS Code extension. The AI capabilities are powered by Watson Code Assistant, a foundation model trained on Ansible Galaxy, GitHub, and other open sources of data.

The technical preview is open and available, free of charge, to all Ansible users. As more users engage with Ansible Lightspeed, the model recommendations will continuously improve, thanks to the valuable input and engagement from the community.

Getting Connected: Installation and Configuration

You'll need Visual Studio Code and Ansible installed on your workstation and a GitHub account to access the Ansible Lightspeed service. Let's get started!

  • Install the Ansible VS Code extension from the Visual Studio Code Marketplace by searching for "ansible" and selecting the extension published by Red Hat.
  • Enable the Ansible Lightspeed service within the extension by accessing the "Extension Settings" via the gear icon.
  • In the settings, enable both "Ansible Lightspeed enabled" and "Enable Ansible Lightspeed with Watson Code Assistant inline suggestions" checkboxes.

Note: You can enable Ansible Lightspeed in the "[User]" or "[Workspace]" settings, based on your preference. More information on VS Code User and Workspace settings can be found in their documentation.

Installing the Ansible Visual Studio Code extension. Installing the Ansible Visual Studio Code extension

  • Click on the Ansible "A" in the VS Code activity bar on the left-hand side of your editor to open the extension.
  • Click "Connect" and follow the prompts to log into GitHub using your credentials.

Log in using your GitHub credentials. Log in using your GitHub credentials

  • Read the Ansible Lightspeed technical preview terms and conditions and click "Agree".
  • Next, authorize Ansible Lightspeed for VS Code by clicking "Authorize".
  • Follow the browser prompts to redirect you back to VS Code, and, finally, click "Open" in the VS Code confirmation dialog box.

Authorize Ansible Lightspeed. Authorize Ansible Lightspeed

Congratulations! You've successfully configured Ansible Lightspeed in VS Code.

You can confirm that Ansible Lightspeed is enabled by checking the VS Code status bar at the bottom of the editor window.

Please ensure a Python environment is selected and your Ansible YAML files are associated with the Ansible language. More information on VS Code languages can be found in their documentation.

Ansible Lightspeed status. Ansible Lightspeed status

A Quick Tour of Ansible Lightspeed: Generating Your First Task

Now that you are connected to Ansible Lightspeed, it's time to experience its AI-enhanced content creation experience.

Let's use an example Playbook to walk through asking Ansible Lightspeed for AI-generated task suggestions and also highlight some of what you can expect in the technical preview release. The example Playbook installs Cockpit on a Red Hat Enterprise Linux system.

Note: As more users engage with Ansible Lightspeed, the breadth, depth, and quality of the recommendations generated by the model will improve. Therefore, the Ansible task suggestions in the examples below may differ from your results.

How do I generate an Ansible Lightspeed suggestion?

Let's use our first Playbook task in the deploy_monitoring.yml example Playbook to demonstrate asking Ansible Lightspeed for an AI suggestion.

  • Move your cursor to the end of the  "- name: Include redhat.rhel_system_roles.cockpit" task description.
  • Press "ENTER" to generate a suggestion.
  • Press "TAB" to accept the suggestion.

Generating an Ansible task. Generating an Ansible task

In this suggestion, we asked Ansible Lightspeed to include the "cockpit" Role, part of the  Red Hat Enterprise Linux System Roles Certified Content Collection. The suggestion used the Fully Qualified Collection Name (FQCN): ansible.builtin.include_role.

Using FQCNs is a recommended best practice and an example of the many unique post-processing capabilities we've baked into the Ansible Lightspeed service.

Let's move on to the next task.

Ansible best practices. We've got you covered.

Ansible Lightspeed best practices example. Ansible Lightspeed best practices example

This Playbook task copies cockpit.conf to the target host. Note that the recommendation included the "mode:" module argument and set the Linux file permissions to 0*644*.

Ansible Lightspeed provided a robust example of setting file permissions for the ansible.builtin.copy module, another recommended best practice.

We'll continue to expand on these natively integrated best practices as the service matures.

Finalizing the Playbook

Let's ask Ansible Lightspeed to generate suggestions for the remaining two Playbook tasks. The first task restarts the Cockpit service to apply our custom cockpit.conf configuration file and the second task permits Cockpit service traffic through the firewall.

Generate remaining Ansible tasks. Generate remaining Ansible tasks

Ansible Lightspeed with Watson Code Assistant and context

Generating contextually aware, accurate Ansible content suggestions saves you time and helps you create efficiently. One of Ansible Lightspeed's superpowers is context.

Ansible Lightspeed uses the Ansible task description and YAML file content to generate suggestions suited to what you're automating. Let's use an example to illustrate this.

Imagine we want to set module defaults for the ansible.posix.firewalld module in the last Ansible task. Specifically, always making the firewall rule changes permanent. We can accomplish this by using the module_defaults Playbook keyword, illustrated below.

module_defaults:
  ansible.posix.firewalld:
    permanent: true

Ansible Playbook module_defaults section

The module defaults section tells Ansible to always add "permanent: true" to every "ansible.posix.firewall" task in the Playbook. Let's ask Ansible Lightspeed for an updated suggestion with the module defaults.

Ansible Lightspeed context. Ansible Lightspeed context

Note that it used the full Playbook context and provided a revised recommendation that excludes "permanent: true". You can also apply this to other Playbook keywords, such as "vars".

Transparency and openness. Ansible Lightspeed Content Source Matching

Last, and certainly not least, is Ansible Lightspeed Content Source Matching.

Ansible Lightspeed Content Source Matching. Ansible Lightspeed Content Source Matching

We transparently share the potential source, Author, and content license of the training data used for the recommendation. Building trust in the community and supporting the relationships between authors and contributors is part of Red Hat's DNA.  These suggestions came from the Ansible community; we don't want to hide that.

Wrap-up

Congratulations! You have successfully configured Ansible Lightspeed in VS Code and experienced its generative AI capabilities with just a few simple steps.

We encourage you to share your feedback on the technical preview experience and stay updated on the project by joining the Ansible Lightspeed Matrix room to ask questions and get the latest news. Please also visit the Ansible Lightspeed landing page.

We'll update you with new resources to help you get the most out of your Ansible Lightspeed with Watson Code Assistant experience.

Happy automating...with AI!


What's New with Cloud Automation with amazon.aws 6.0.0

What's New with Cloud Automation with amazon.aws 6.0.0

When it comes to Amazon Web Services (AWS) infrastructure automation, the latest release of the certified amazon.aws Collection for Red Hat Ansible Automation Platform brings a number of enhancements to improve the overall user experience and speed up the process from development to production.

This blog post goes through changes and highlights what's new in the 6.0.0 release of this Ansible Content Collection. We have included numerous bug fixes, features, and code quality improvements that further enhance the amazon.aws Collection. Let's go through some of them!

Forward-looking Changes

New boto3/botocore Versioning

The amazon.aws Collection has dropped support for botocore<1.25.0 and boto3<1.22.0. Most modules will continue to work with older versions of the AWS Software Development Kit (SDK), however, compatibility with older versions of the AWS SDK is not guaranteed and will not be tested. When using older versions of the AWS SDK, a warning will be displayed by Ansible. Check out the module documentation for the minimum required version for each module. 

New Python Support Policy

On July 30, 2022, AWS announced that the AWS Command Line Interface (AWS CLI) v1 and AWS SDK for Python (boto3 and botocore), will no longer support Python 3.6. To continue supporting Red Hat's customers with secure and maintainable tools, we will be aligning with these deprecations and we will deprecate support for Python versions less than 3.7 by this collection. However, support for Python versions less than 3.7 by this collection will be removed in release 7.0.0. Additionally, support for Python versions less than 3.8 is expected to be removed in a release after 2024-12-01 based on currently available schedules.

Removed Features

The following features have been removed from this collection release.

  • ec2_vpc_endpoint_info - Support for the query parameter has been removed. The amazon.aws.ec2_vpc_endpoint_info module now only queries for endpoints. Services can be queried using the amazon.aws.ec2_vpc_endpoint_service_info module.
  • s3_object - Support for creating and deleting S3 buckets using the amazon.aws.s3_object module has been removed. S3 buckets can be created and deleted using the amazon.aws.s3_bucket module.

Deprecated Features

This collection release also introduces some deprecations. For consistency between the collection and AWS documentation, the boto3_profile alias for the profile option has been deprecated. Please use profile instead.

The amazon.aws.s3_object and amazon.aws.s3_object_info modules have also undergone several deprecations.

  • Passing contemporarily dualstack and endpoint_url has been deprecated. The dualstack parameter is ignored when endpoint_url  is passed. Support will be removed in a release after 2024-12-01 .
  • Support for passing values of overwrite other than always, never, different or last has been deprecated. Boolean values should be replaced by the strings always or never. Support will be removed in a release after 2024-12-01.

Code quality and CI improvement

Part of the effort in this release was dedicated to improving the quality of the collection's code. We have adopted several linting and formatting tools that help enforce coding conventions and best practices, with all code following the same style and standards. The linting tools help detect and flag code that may not be optimal, such as unused variables or functions, unnecessary loops or conditions, detect security vulnerabilities, and other inefficiencies. Formatting tools help to automatically format and style the code to ensure consistency and readability. 

Overall, this code quality improvement initiative aims to lead to more reliable, efficient and maintainable software that provides a better user experience and ultimately benefits both developers and end users. In addition, several plugins have undergone refactoring (e.g., removing duplicate code, simplifying complex logic and using design patterns where appropriate) to make the code more efficient and maintainable. We have also extended the coverage of unit tests so the code behaves as expected.

This initiative does not stop here. We have also decided to move to GitHub actions for CI from Zuul. This decision helps us simplify the CI pipeline as it is natively integrated with GitHub and improves scalability, collaboration, workflow management and the efficiency of the development process.

Because improving code quality is a continuous process that requires ongoing effort and attention, this work is ongoing and will be reflected in future releases.

Renamings

As naming might be generally tedious, a misleading module or option's name may complicate the user experience.

We decided to rename the amazon.aws.aws_secret lookup plugin in this collection release. This decision is a follow up of the renaming initiative started in release 5.0.0 of this collection. Therefore, the amazon.aws.aws_secret module has been renamed to amazon.aws.secretsmanager_secret

We have also decided to rename the amazon.aws.aws_ssm lookup plugin to amazon.aws.ssm_parameter.

However, aws_secret and aws_ssm remain as aliases and they will be deprecated in the future. 

For consistency amongst our plugins and modules, we renamed the following options:

  • aws_profile renamed to profile (aws_profile remains as an alias)
  • aws_access_key renamed to access_key (aws_access_key remains as an alias)
  • aws_secret_key renamed to secret_key (aws_secret_key remains as an alias)
  • aws_security_token renamed to security_token (aws_security_token remains as an alias)

These changes should not have observable effect for users outside the module/plugin documentation.

New Modules

This release brings a number of new base supported modules that implement AWS Backup capabilities. 

AWS Backup is a fully managed backup service that enables you to centralize and automate the backup of data across AWS services and on-premises applications,  eliminating the need for custom scripts and manual processes. 

With AWS Backup, you can create backup policies that define backup schedules and retention periods for your AWS resources, including Amazon EBS volumes, Amazon RDS databases, Amazon DynamoDB tables, Amazon EFS file systems, and Amazon EC2 instances. 

The following table highlights the functionalities covered by these new Red Hat supported modules:

  • backup_restore_job_info - Get detailed information about AWS Backup restore jobs initiated to restore a saved resource.
  • backup_vault - Manage AWS Backup vaults.
  • backup_vault_info - Get detailed information about an AWS Backup vault.
  • backup_plan - Manage AWS Backup plans.
  • backup_plan_info - Get detailed information about an AWS Backup Plan.
  • backup_selection - Manages AWS Backup selections.
  • backup_selection_info - Get detailed information about AWS Backup selections.
  • backup_tag - Manage tags on an  AWS backup plan, AWS backup vault, AWS recovery point.
  • backup_tag_info - List tags on AWS Backup resources.

Automate backups of your AWS resources with the new AWS Backup supported modules

In this example, I show you how to backup an RDS instance tagged backup: "daily". This example can be extended to all currently supported resource types (e.g., EC2, EFS, EBS, DynamoDB) which are tagged with backup: "daily". The following playbook shows the the steps necessary to achieve that:

- name: Automated backups of your AWS resources with AWS Backup
  hosts: localhost
  gather_facts: false


  tasks:
  - name: Create a mariadb instance tagged with backup; daily
     amazon.aws.rds_instance:
       id: "demo-backup-rdsinstance"
       state: present
       engine: mariadb
       username: 'test'
       password: 'test12345678'
       db_instance_class: 'db.t3.micro'
       allocated_storage: 20
       deletion_protection: true
       tags:
         backup: "daily"
     register: result


   - name: Create an IAM Role that is needed for AWS Backup
     community.aws.iam_role:
       name: "backup-role"
       assume_role_policy_document: '{{ lookup("file", "backup-policy.json") }}'
       create_instance_profile: no
       description: "Ansible AWS Backup Role"
       managed_policy:
         - "arn:aws:iam::aws:policy/service-role/AWSBackupServiceRolePolicyForBackup"
     register: iam_role


   - name: Create an AWS Backup vault for the plan to target
     # The AWS Backup vault is the data store for the backed up data.
     amazon.aws.backup_vault:
       backup_vault_name: "demo-backup-vault"


   - name: Get detailed information about the AWS Backup vault
     amazon.aws.backup_vault_info:
       backup_vault_names:
         - "demo-backup-vault"
     register: _info


   - name: Tag the AWS backup vault
     amazon.aws.backup_tag:
       resource: "{{ _info.backup_vaults.backup_vault_arn }}"
       tags:
           environment: test


   - name: Create an AWS Backup plan
     # A backup plan tells AWS Backup service to backup resources each day at 5 oclock in the morning. In the backup rules we specify the AWS Backup vault to target for storing recovery points.
     amazon.aws.backup_plan:
       backup_plan_name: "demo-backup-plan"
       rules:
         - rule_name: daily
           target_backup_vault_name: "demo-backup-vault"
           schedule_expression: "cron(0 5 ? * * *)"
           start_window_minutes: 60
           completion_window_minutes: 1440
     register: backup_plan_create_result


   - name: Get detailed information about the AWS Backup plan
     amazon.aws.backup_plan_info:
       backup_plan_names:
         - "demo-backup-plan"
     register: backup_plan_info_result


   - name: Create an AWS Backup selection
     # AWS Backup selection supports tag-based resource selection. This means that resources that should be backed up by the AWS Backup plan needs to be tagged with backup: daily and they are then automatically backed up by AWS Backup.
     amazon.aws.backup_selection:
      selection_name: "demo-backup-selection"
      backup_plan_name: "demo-backup-plan"
      iam_role_arn: "{{ iam_role.iam_role.arn }}"
      list_of_tags:
         - condition_type: "STRINGEQUALS"
           condition_key: "backup"
           condition_value: "daily"
     register: backup_selection_create_result


   - name: Get detailed information about the AWS Backup selection
     amazon.aws.backup_selection_info:
       backup_plan_name: "demo-backup-plan"

Once this playbook has finished the execution, AWS Backup will start to create daily backups of the resources tagged with backup=daily. You can monitor the status of the backup service demo on the AWS console. If we go to Jobs, we see some backup jobs that have already been completed. A backup job is the result of an AWS Backup plan rule and resource selection. It will attempt to backup the selected resources, within the time window defined in the backup plan rule.

screenshot

If we're taking a look at the AWS Backup vault we created, you can see it contains the recovery points of the RDS instance. A recovery point is either a snapshot or a point-in-time recovery backup. The data inside a recovery point cannot be edited. Tags and retention period can be changed if the backup vault allows it. You can use the recovery point to restore data.

screenshot

An AWS Backup restore job is used to restore data from backups taken with AWS Backup service. This release does not include the module that enables you to create an AWS backup restore job, but we are planning to include this feature in the future. However, in this release, we have included the amazon.aws.backup_restore_job_info module to get information about the restore job.

- name: Get detailed information about the AWS Backup restore job
  amazon.aws.backup_restore_job_info:
    restore_job_id: "{{ restore_job_id }}"


Event-Driven Ansible is Here

As you may recall, we introduced Event-Driven Ansible in developer preview last fall at AnsibleFest. Since that time, much work has been done across the community, the Red Hat development teams, customers, and last but not least, Red Hat partners. Today, we are pleased to announce that Event-Driven Ansible will be concluding its developer preview and will become generally available as part of Red Hat Ansible Automation Platform 2.4.

If you are new to Event-Driven Ansible, check out the developer preview blog I wrote last fall to learn the basics, and you may also be interested in this video on Ansible Rulebooks, as well as others in this playlist.

Transform your work with Event-Driven Ansible

For many IT teams, there is too much work to do and not enough time to get it all done. Event-Driven Ansible can help your team work smarter, not harder. How often are you doing routine tasks that get in the way of key priorities? How often are you needing to "drop everything" to respond to a ticket enrichment request or handle a user administration issue? Have you had to wake up at night to remediate an issue? How often are you adjusting applications and underlying technologies to support fluctuating workloads?

You will be happy to know there is a better way, and it is event-driven automation. Many pieces of recurring operational logic and processes can be automated by capturing them in Ansible Rulebooks, including issue remediation, fact gathering for service tickets, user administration tasks, and many more. But what are Ansible Rulebooks? Based on YAML, they are the basis of Event-Driven Ansible and contain conditional "if-this-then-that" logic.

Event-Driven Ansible can also be used with scalability logic, or using rulebooks to codify scalability actions for rapid and seamless response, such as adding capacity or adjusting buffer pool size when an application or workload calls for it, or scaling out hybrid-cloud solutions when certain conditions are met, and so on.

Event-driven patterns of automation make it faster to act on recurring events and also provide a simple way of distributing operational or scalability knowledge as an easy to read and verifiable structure. Event-Driven Ansible is accessible enough to be used by IT domain experts to solve a range of needs across use cases including infrastructure, networking, security, cloud and others.

When your organization adopts event-driven automation techniques, your entire team can execute in a consistent and accurate way. You gain new levels of efficiency and can better focus on the innovations that give your business an edge.

New features and enhancements

What can you expect from Event-Driven Ansible as part of this release? Several new components and features have been added. These include:

  • Event-Driven Ansible controller, which enables orchestration of multiple rulebooks and provides a single interface to manage and audit all responses across all event sources. These event sources are often third party monitoring and observability tools, but can be any source that provides intelligence about your IT environment.

  • Integration with automation controller in Ansible Automation Platform, which allows you to call existing workflows that you’ve already built using the run_job_template action, thus extending existing, trusted automation into event-driven automation scenarios. This is an optional way to specify actions from within rulebooks. You can also call an existing Ansible Playbook within your rulebooks, if you prefer.

  • Event throttling, which allows you to handle "event storms" using either a reactive approach with the once_within

Event-Driven Ansible ecosystem integrations

An ecosystem of Ansible Content Collections is important for Event-Driven Ansible because it works on the intelligence of changing IT conditions that come from event sources such as third party monitoring and observability tools. Ansible Content Collections are a variety of assets that help you jumpstart new automation projects. In the Event-Driven Ansible case, these assets typically are source plug-ins and rulebooks, but may also include other types of useful content. Red Hat Ansible Certified Content Collections are supported by Red Hat and/or partners and typically focus on the "how-to" of some type of automation. Ansible validated content focuses more on "what-to-do" scenarios, including best practices.

There has been extensive work done across the Event-Driven Ansible ecosystem in terms of new content, by both the community and third party Red Hat partners. The following is an overview of the work that has been done and what is to come:

Certified and validated content

The initial list of partners who are or will be certifying or validating content includes: Cisco ThousandEyes, CrowdStrike, CyberArk, Dynatrace, F5, IBM, Palo Alto Networks, and Zabbix and there are more to come. Red Hat has also developed key integrations including Apache Kafka, webhooks, Red Hat Insights, Red Hat OpenShift, Cisco NX-OS and Model-Driven Telemetry, AWS and more. Refer to the image below. More integrations are coming soon, including ServiceNow, Microsoft Azure, Google Cloud Platform and others.

Certified Content for Event-Driven Ansible generally is certified event source plugins, written in python, which connect an event source to Ansible Rulebooks. Validated Content for Event-Driven Ansible is generally Ansible Rulebooks which have been validated and contains best practices for common use cases.

Community- and custom-developed content

Community and custom content is available either upstream or through private customer sources. Community-developed integrations have included gcp pubsub and syslogd, among others.

Whether you have homegrown monitoring tools or need a specific solution immediately, you can build your own plug-ins for Event-Driven Ansible. Once you build your plug-in, consider whether this can be contributed to the Ansible community.

Getting Involved with Event-Driven Ansible

Ready to start exploring Event-Driven Ansible? There are a number of ways to do this. Visit Red Hat's Event-Driven Ansible page where you will find a series of free, self-paced interactive labs, information and analyst research.

You can also join a getting started with Event-Driven Ansiblewebinar on June 20, 2023.

Additional resources