Continuous Detection and Mitigation (CDM)

Continuous Detection and Mitigation (CDM)

Per NASCIO, the top priority for state CIOs is cybersecurity and risk management. A key focus for this initiative is to leverage the Continuous Diagnostics and Mitigation (CDM) framework provided by the Cybersecurity and Infrastructure Security Agency (CISA). In this blog post we will explore a high level view of the CDM framework, review Ansible's role in security automation and finally understand how Ansible can help agencies with Day 0 through Day 2 tasks while working with the CDM framework.

What is CDM?

Today more than ever, cyber threats mean that securing and defending our networks are of utmost importance. A recent report published by the National League of Cities revealed that an astonishing 44% of local governments report they experience a cyberattack daily or even hourly. So it is not surprising to see that cybersecurity and risk management is the number one priority for our state CIOs. With that background, let's understand the CDM program.

CDM program diagram

Source: https://www.cisa.gov/cdm-training

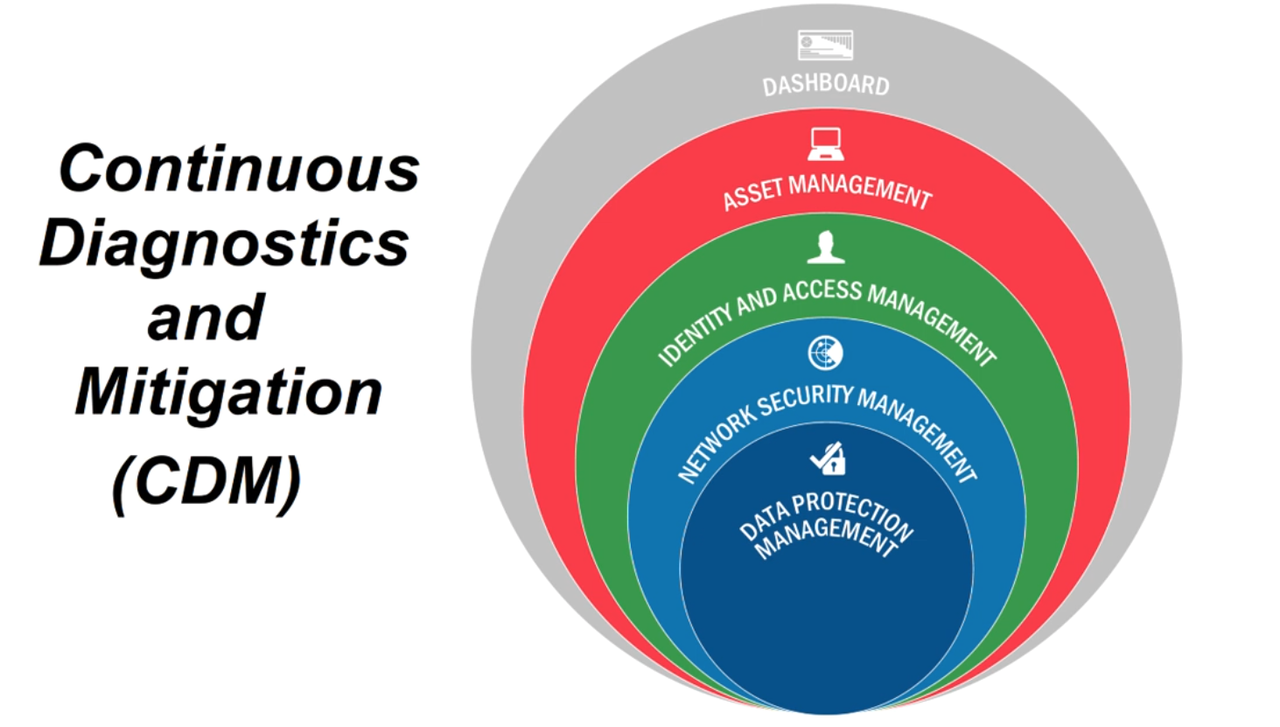
The CDM framework is defined by CISA. CDM provides capabilities and tools that help identify cybersecurity risks on an ongoing basis, prioritize these risks and enable cybersecurity personnel to mitigate them based on priority.

At its core it provides tools and dashboards that enable cybersecurity professionals to understand what is on the network, who is on the network, and what's happening on the network. CISA's CDM is leading that effort to reduce cyber risk by delivering tools to federal/state agencies to strengthen their ability to monitor and manage the threat of cyber vulnerabilities.

The CDM model

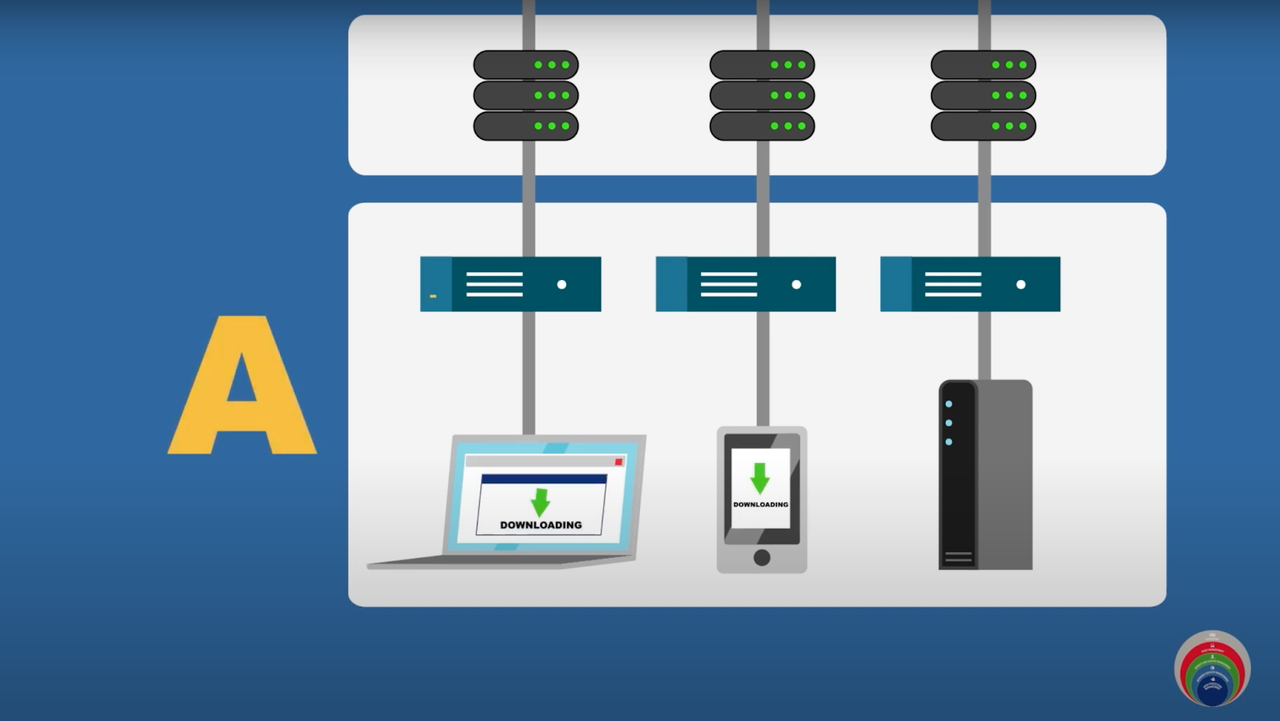
The CDM framework provides an opinionated four layer architecture. The first layer, layer A, consists of sensors and scanners that are deployed in the network. These scanners and sensors continuously collect data that match against fingerprints and send it up to the second layer, layer B, or the integration layer. 

CDM model layer a

The second layer, Layer B, normalizes the data sent in by the Layer A sensors and scanners. This serves as the correlation point.

CDM model layer b

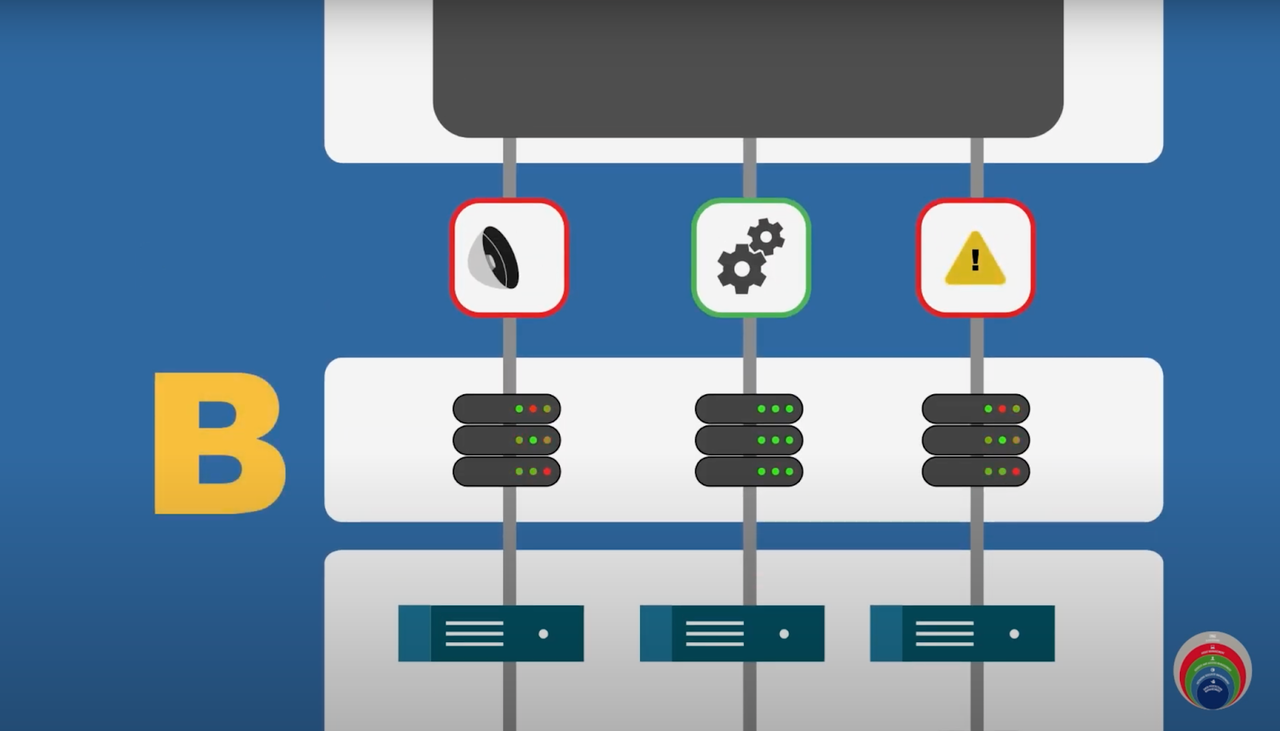
After normalization, the data is fed up into the C&D layers that consist of agency level and federal level dashboards.

CDM model layer c

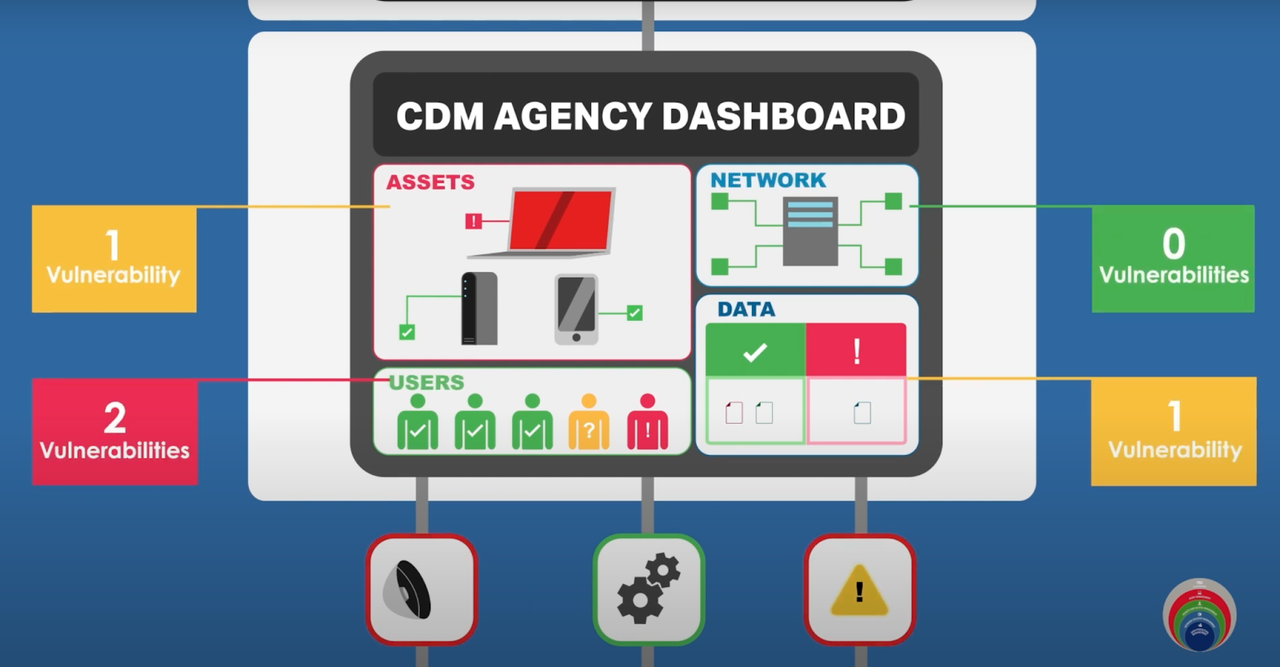
Source: CISA's YouTube channel

Agency security personnel then reviews the dashboards and makes decisions on prioritizing and mitigating the alerts.

Ansible for security automation

Ansible has been a leader in the infrastructure automation domain for years now. The value that Ansible brings to the infrastructure domain easily translates into the security automation space, including:

  • Increases speed: Reduce the number of manual steps and GUI-clicks. Enables the integration between numerous security solutions at the agency.
  • Reduces human errors: Minimizes risk with automated workflows and human operator errors in time-sensitive, stressful situations.
  • Enforces consistency: Enables auditable and verifiable security processes by using a single framework across multiple security tools.

The scale and complexity of the modern infrastructure that needs to be protected in combination with the challenge of speed brought by modern cyberattacks using automation themselves require technology to support human operators. The challenges for cybersecurity teams is managing multiple security tools within the CDM architecture,integrating between the tools and using the tool data to effectively manage changes to their end-points.

Ansible for the CDM use case

CDM has an opinionated architecture and an approved product list of over 240,000 products that agencies can use. You can imagine the integration needs for CDM implementations across agencies for the different products involved. Red Hat Ansible Automation Platform is one of the approved products sanctioned for the CDM use case. So where does Ansible fit in this four layered CDM model? Let's take a look at layer A that consists of sensor and scanners:

CDM Ansible

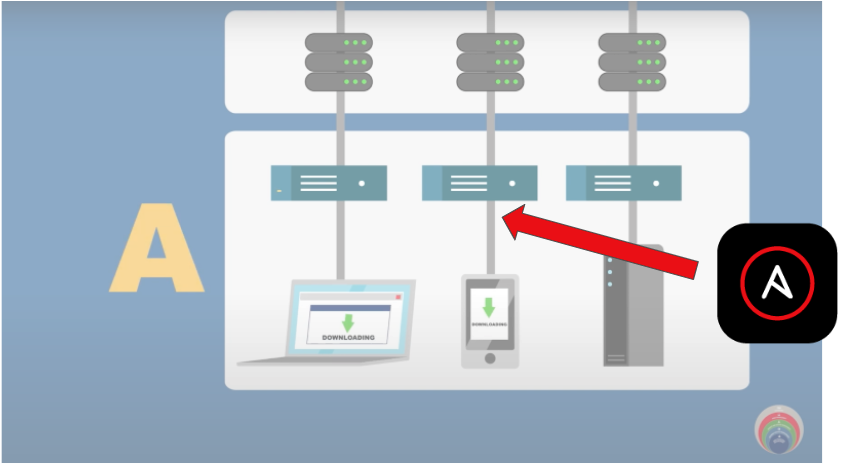
The two use cases that are immediately apparent for this layer are:

  1. Log enrichment
  2. Fingerprint/signature updates

Each time the security operations center (SOC) needs to triage an incident, they might need increased verbosity of logs from the sensors or from the endpoint themselves. Typically this eliminates potential false positives. Doing this manually means SOC personnel have to log in and make these configuration changes. Doing this at scale across an agency can be manually intensive and prone to human error. And of course after investigation these log levels need to be reset to standard! Using Ansible to automatically turn on log enrichment during the investigation and subsequently turn off the verbosity at scale is an effective use case for the CDM layer A sensors and scanners. 

Scanners and sensors that make up layer A will need timely updates to fingerprints based on newer attack vectors. Imagine having to manually update these fingerprints across thousands of sensors! Ansible can be a good solution to automate this Day 2 operational task needed for layer A.

What about layer B? If you recall, layer B collates the logs from layer A and normalizes the data along with correlating it.

CDM model layer b with Ansible

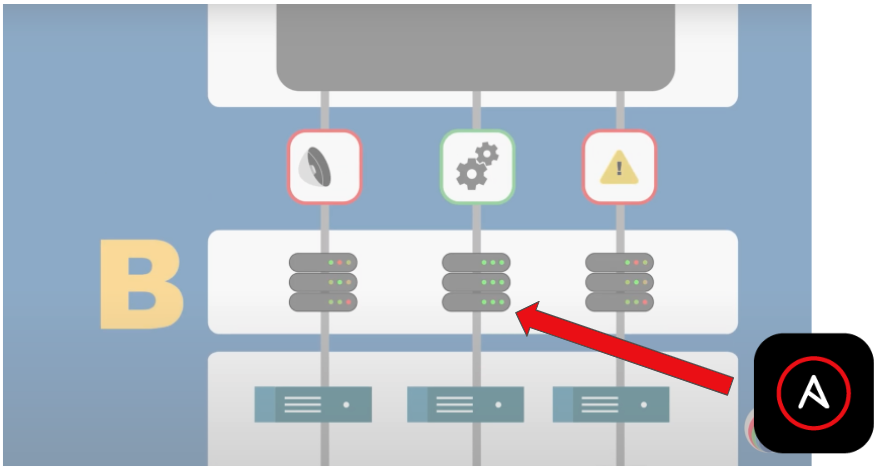
These devices are servers, which are subject to all the traditional Day 2 operations that automation can help, such as patching, OS upgrades, and software updates. 

Finally, the C and D layers serve dashboards that a SOC personnel reviews and acts on. 

CDM dashboard with Ansible

Having Ansible Playbooks to mitigate known vulnerabilities could be leveraged at this layer with API integration with automation controller . Ansible is a proven multi-vendor automation platform. Agencies could adopt automated mitigation for known vulnerabilities by firing off an automation request to Ansible. Another use case is automating some aspects of triage coordination. For example, if multiple teams are needed to look into a certain alert, Ansible could fire off tickets automatically to the appropriate teams who can then start their triage (and even use Ansible for that triage process).

Summary

In summary, CDM is an opinionated security framework laid out by CISA and adopted by agencies as a way to address cybersecurity and threat response. CDM prescribes an approved list of products, which include Ansible Automation Platform, that agencies can leverage. Ansible Automation Platform can be a valuable platform for automating the different layers of CDM. Benefits include:

  1. Sensors and scanners: 

    • Log enrichment
    • Update signatures
  2. Integration layer: 

    • Patching
    • Day 2 Operations
  3. Mitigation

    • Automated mitigation
    • Triage coordination


Deep dive on Ansible VScode extension

Deep dive on Ansible VScode extension

Ansible as part of the Red Hat Ansible Automation Platform continues to grow and mature. Recent enhancements include Ansible Content Collections, automation execution environments, and an increasing list of integrations using plugins and modules. It is more important than ever that both new and experienced content creators have access to tools that help them write better content faster. The newly created Ansible Devtools initiative focuses on developing and enhancing tools like ansible-navigator, Ansible VScode extension, ansible-lint and so on to help ease the Ansible automation content creator experience. In this blog, we will do a deep dive into the Ansible VSCode extension, giving an overview of how it works and the initial setup required to get it working after installation.

Evolution

The Ansible VSCode extension was initially a fork of Tomasz Maciążek's VSCode extension. After the fork, the server and client-side code were decoupled into their own separate repositories to allow independent releases for both server and client.

  1. Ansible language server
  2. Ansible VSCode extension 

The Ansible Language Server is released as a node module on the npm repository, allowing it to be reused by other editors supporting language server protocol, while the VSCode extension client was released on the marketplace with many additional features.

Tomasz continues to be a core contributor to the Ansible extension and we would like to thank him and all the other community members for their contributions to help make the extension better for Ansible content creators with every new release.

Introduction to the language server protocol (LSP)

The Ansible Language Server implements language server protocol (LSP), which is an open, JSON-RPC based protocol that is used between source code editors, integrated development environments (IDEs) and servers that provide programming language-specific features. The goal of the protocol is to allow programming language support to be implemented and distributed independently of any given editor or IDE.

LSP diagram

Source: https://code.visualstudio.com/api/language-extensions/language-server-extension-guide

As seen from the above diagram, the language server protocol allows a single language server implementation to be reused by multiple code editors or IDEs, thus avoiding the need to duplicate language-related support for each editor as in the case of no LSP. The language server runs as a separate process and the development tools like VSCode communicate with the server using the language protocol over JSON-RPC. For more details refer to the language server specification.

Ansible Language Server

Ansible language server diagram

The Ansible Language Server provides features like:

  • Code completion
  • Hover (display keyword description on hover)
  • Goto definition (for modules)
  • Diagnostics and so on

It serves the JSON-RPC request sent by the development tool (client). The language server runs Ansible commands like ansible-config, ansible-playbook and so on to support these features and thus requires an Ansible package or ansible-core installed locally or within an automation execution environment. In addition, the language server relies on ansible-lint for providing diagnostic information if installed and enabled (default). While running with an automation execution environment, ansible-core and optionally ansible-lint should be included.

Extension installation

In the VSCode Extensions tab, search and install the Ansible VS Code Extension.

Note: 

  • When the extension is installed for the first time, the "Runtime Status" is "Not yet activated" which indicates that the extension is not yet running. The status will be activated only after a file is opened in the editor and the language identified for the file is "Ansible".
  • For Windows users, the extension works with WSL2 and not on native Windows.

Ansible extension settings

The Ansible extension supports multiple configuration options allowing, for instance, to change the executable path for Ansible, ansible-lint, python interpreter and so on. There is also an option to enable the automation execution environment and users can choose the container engine, image name, pull policy and more. To see and change the configuration options in the VSCode window, go to Code->Preference->Settings and in the Search settings box type "ansible" as shown in the below snapshot.

vscode extension screenshot

The preferences can be set for a given user or workspace, and depending on the environment, also for remote type and workspace folder. Settings in the user scope will be applied globally for any instance of VSCode that is opened. Workspace scoped settings will be stored inside your workspace and only apply when the current workspace is opened. For more information refer to the VSCode documentation here. Alternatively, for workspace settings, you can also provide the Ansible settings by editing the .vscode/settings.json file within the workspace root folder as shown below.

vscode extension screenshot

Activating and using Ansible extension

As stated above, the vscode-ansible extension depends on the ansible-language-serverrunning as a background process to provide features for Ansible Playbooks and task files like auto-completion, hover, diagnostics, goto and more. The extension also depends on the Red Hat vscode-yaml extension to provide auto-completion and diagnostics information of other related files like Ansible vars file, ansible-navigator settings file,  ansible-galaxy requirements and metafiles, ansible-lint configuration file and other YAML files. The extension uses file pattern match to associate the file with the YAML language. For details about the file pattern and associated schema file used by the vscode-yamlextension, read more here.

With this context set, you can now go ahead and open the root of your Ansible project in the VSCode window. That folder will be a root of your workspace, also treated as the current working directory by the Ansible Language Server while executing Ansible commands in the background. If you try to open an Ansible file without first setting up a workspace, the plugin might not be able to determine the context (such as CWD) correctly.

After an Ansible file is opened in the VSCode window, it might not be identified correctly as an Ansible language type as seen in the below snapshot. Most likely, the file will be identified as "YAML" language since Ansible files have either "yaml" or "yml" extension and installing the vscode-ansible extension, in turn, installs the vscode-yamlextension.

vscode extension screenshot

Hovering the cursor on the language identified (YAML in this case) in the bottom right corner you will see "Select Language Mode". By clicking on the identified language name (YAML) it will open a drop-down menu; type "Ansible" in the tab and then select it. After doing this, you will notice the identified language for the file is changed to "Ansible" as shown in the below snapshot.

vscode extension screenshot

When the file language is identified as Ansible for the first time, the vscode-ansible extension will be activated and the extension will run the ansible-language-server process in the background which provides auto-completion, hover and diagnostics information as you type and/or hover within the file. The diagnostics information will be available in the PROBLEMS tab. If it's installed and enabled, the language server will run ansible-lint by default to generate diagnostics information on the open file. If ansible-lint is not installed, the server will run ansible-playbook --syntax-check to generate diagnostics information.

Instead of changing the language for each file, you can set the file associations setting by clicking on "Code -> Preferences -> Settings" and typing "file associations" in the search box. Add an item to associate the extension with the language type as shown in the below snapshot.

vscode extension screenshot

For more information on file associations, refer to the document here.

Using automation execution environments

To see the automation execution environments supported by extension, you can go to settings (Code -> Preferences -> Settings) and type "ansible.execution environment".

vscode extension screenshot

After enabling the execution environment (EE), the extension will pull the "quay.io/ansible/creator-ee:latest" image by default, if it is not present locally. The value of the image can be changed by providing the intended value for "ansible.executionEnvironment.image" setting. After the EE pull is successful, the Ansible extension will copy the plugins docs from within EE to the local cache folder and it will be used to provide auto-completion, hover and goto functionality. Since the "creator-ee" image has "ansible-lint" bundled, the Ansible extension and ansible-language-server will volume mount the entire workspace within the EE and run "ansible-lint" or "ansible-playbook ---syntax-check" based on settings to provide diagnostics information in editor.

vscode extension screenshot

Note: 

  • If auto-completion and other features are not working after enabling the execution environment, you can reload VS Code by opening the command palette ("view -> Command Palette") and executing the "Developer: Reload Window" command, which also restarts the "ansible-language-server" process running in the background.
  • If the extension is not working as expected, you can follow the debug steps shown here. If it is still not working, please do raise an issue here

The auto-completions will now provide suggestions for plugins that are part of the given execution environment image name.

vscode extension screenshot

The "trigger suggest" key depends on the keyboard shortcut. To view the associated keys, go to Code -> Preferences -> Keyboard Shortcuts.

vscode extension screenshot

Ansible Playbook run entry point

The extension also provides an option to run an Ansible Playbook from within the extension either using "ansible-navigator run" or "ansible-playbook" command as shown in the below snapshot.

vscode extension screenshot